Laboratory, 01.03.2001
This method is used to measure very small dispalements (nanometer) in
one direction.
The displacement equals
 ; where lambda is the wavelength of
the lightsource used and N is the number of the fringe observed at a
certain location.
The light source has to emit coherent light (constant in wavelength
and amplitude), so only a laser can be used. The beam is sent to a
splitter, there it continues in two directions: one beam is going
through lenses to the object to be measured (directed by mirrors), and
from there to the holographic plate (which is recording the image), and
the other beam is directed by mirrors directly to the holographic
plate.
In order to measure the displacement of an object under a certain
load, two images are necessary (both on the same plate): first w/o
load then with the applied load. Each time the light source is opened
for about 4 seconds. After developing the holographic plate the result
can be seen: black fringes are going across the measured object. These
fringes are the result of interference: whenever the lowest peak of an
amplitude and the highest peak meet, the result is zero, thus a fringe
indicates a difference in displacement of half a wavelength. But in
order to know what fringe represents what number a reference is
needed. This can be done by a thin metal object (like a feeler gauge)
touching the object to be measured, and rigidly fixed to the main
platform. Since the fixture holding the gauge is rigid, and no loads
are applied to that fixture, the fringes on the gauge start at
zero. At the point where the gauge and the object meet the
dislpacement has to be the same, thus the number of the fringe is the
same. Starting from that fringe the displacement of each fringe can
now be calculated.
; where lambda is the wavelength of
the lightsource used and N is the number of the fringe observed at a
certain location.
The light source has to emit coherent light (constant in wavelength
and amplitude), so only a laser can be used. The beam is sent to a
splitter, there it continues in two directions: one beam is going
through lenses to the object to be measured (directed by mirrors), and
from there to the holographic plate (which is recording the image), and
the other beam is directed by mirrors directly to the holographic
plate.
In order to measure the displacement of an object under a certain
load, two images are necessary (both on the same plate): first w/o
load then with the applied load. Each time the light source is opened
for about 4 seconds. After developing the holographic plate the result
can be seen: black fringes are going across the measured object. These
fringes are the result of interference: whenever the lowest peak of an
amplitude and the highest peak meet, the result is zero, thus a fringe
indicates a difference in displacement of half a wavelength. But in
order to know what fringe represents what number a reference is
needed. This can be done by a thin metal object (like a feeler gauge)
touching the object to be measured, and rigidly fixed to the main
platform. Since the fixture holding the gauge is rigid, and no loads
are applied to that fixture, the fringes on the gauge start at
zero. At the point where the gauge and the object meet the
dislpacement has to be the same, thus the number of the fringe is the
same. Starting from that fringe the displacement of each fringe can
now be calculated.
A holographic interference measurement was made on a cervical spine
fixator.
In certain cases a fixator like that might be needed
to support the spine, when for example the disc between the spines is
damaged. A loading system had been build with real cervical vertebrae
(C5 and C6) and a fixator plate. Two pictures were taken with
different loads applied.
Laboratory, 08.03.2001
Like holographic interferometry the method of speckle photography
is also used for the measurement of small displacements of objects
without touching these objects. Speckle photography is not quite as precise
as holographic interferometry, it only measures in the area of
mikrometers. While holographic interferometrie was measuring the
displacement in the one direction orthogonal to the object, speckel
photography is measuring the displacement vector in the plane parallel
to the object. Two images must be taken: one before and one after
applying a load. The results must be viewed with laser light also.
The light is going through the holografic plate and produces
a pattern of fringes on the screen behind the plate.
With that pattern of fringes the displacement can be calculated.
 |
= |
distance between the holografic plate and the screen |
 |
= |
displacement vector |
 |
= |
wavelength of lightsource, here it is 514 nm |
 |
= |
ratio of the size of the object on the holographic plate and the real object |
 |
= |
distance between two fringes |
Since is usually much smaller than this formula can be simplified to
The angle  of the fringe is also the angle of the displacement
vector . So the displacement in x-direction is
of the fringe is also the angle of the displacement
vector . So the displacement in x-direction is  and in
the y-direction it is
and in
the y-direction it is  .
.
Here also the light source needs to be coherent, so laser light must be used.
The beam is send via mirrors to the object, and the light is
reflected from the object onto the holographic plate.
The laser, the object and the mirrors are all placed on a solid,
air-cushioned base, which prevents outside noise from disturbing the measurement.
In order to treat a fracture of the mandibula (lower jaw) a fixator
plate can be applied. Now the question is: how does the mandibula
behave under different stresses in different locations. So a loading
system has been built, where different loads can be simulated, and
also the influence of the two main muscles moving the jaw.
15.03.2001
The theory behind this method was discovered 1816 by Sir David Brewster,
but because of a lack of suitable materials it was not applied until
the introduction of celluloid.
The method is based on the principle of polarisation.
Normally the movement vector of light is random.
After passing a polariser the vector points in one direction only,
perpendicular to the axis of the light beam.
An analyser is another polarizing filter,
with it's filtering plane rotated 90 degrees in relation to the polariser.
So far no light can pass the analyser.
If an object of holografic material is placed between the polariser and the analyser
there is still no light passing.
This changes when tension is applied on the object.
The beam coming through the polariser (the vector of movement is in one plane)
is split into the direction of the principal stresses  and
and  .
This behaviour is a feature special to holographic material, and results from
the changed density of the object in different points when being deformed.
The two resulting beams are passing through the object with different velocities:
one beam is going into the object, an two beams are leaving the object, going
towards the analyser with a relative retardation of one beam to the other.
The retardation is depending on:
.
This behaviour is a feature special to holographic material, and results from
the changed density of the object in different points when being deformed.
The two resulting beams are passing through the object with different velocities:
one beam is going into the object, an two beams are leaving the object, going
towards the analyser with a relative retardation of one beam to the other.
The retardation is depending on:
- the difference of principal stresses and
- the thickness
 of the model
When the two beams reach the ananlyser only the components parallel o the polarization
axis are passing.
If the ratardation is equal to the wavelength of the lightsource,
then the light is extinguished:
- in the case of white light being used:
if the retardation is equal to the (multiple) of the wavelength of one of the colours of the spectrum
then that colour is being eliminated from the spectrum
, the remaining light is not white anymore but colored.
The color of the remaining light depends on the color that has been removed.
- if monochromatic light is used:
no light is passing the analyzer at the point where the retardation is equal to a multiple of the wavelength.
Lines of such points are black and are called fringes.
In all points of the same color/ in the same fringe the retardation is the same

 is the same.
Such lines are referred to as isochromatics.
When the retardation is a multiple of the same effect happens, and another fringe is visible.
is the same.
Such lines are referred to as isochromatics.
When the retardation is a multiple of the same effect happens, and another fringe is visible.
On the edge of the model, along the contour, there is principal stress in one direction only
since is zero.
The stress  can be calculated with the formula:
with
 = number of fringe
 = material constant
= thickness of model
The obtained values for  are absolute values only, they contain no information
wether the stress is tension or compression.
are absolute values only, they contain no information
wether the stress is tension or compression.
When the direction of the principal stress is parallel to the plane of polarisation of the polariser
there is no light going through the analyser, the point is dark. Thus lines of the same direction of principle
stress can be seen.
These lines are called isoclinics.
A femur bone was the object of interest.
A model of the frontal crossection had been built, with  and
and
 .
This model was placed into a loading system: The distal part of the bone was fixed to the base, simulating
the knee joint,
on the head a load was applied, simulating the load transmission of the pelvic bone,
also, via levers and a wire, a portion of same load was pulling on the greater trochanter,
simulating the influence of the muscles attached to it.
Because of the dimensions of the model and the loading system the load was not
distributed evenly on the head, but acting on two points only, so the load
.
This model was placed into a loading system: The distal part of the bone was fixed to the base, simulating
the knee joint,
on the head a load was applied, simulating the load transmission of the pelvic bone,
also, via levers and a wire, a portion of same load was pulling on the greater trochanter,
simulating the influence of the muscles attached to it.
Because of the dimensions of the model and the loading system the load was not
distributed evenly on the head, but acting on two points only, so the load  can be divided into
  and
and  .
.
Figure 1:
forces and levers
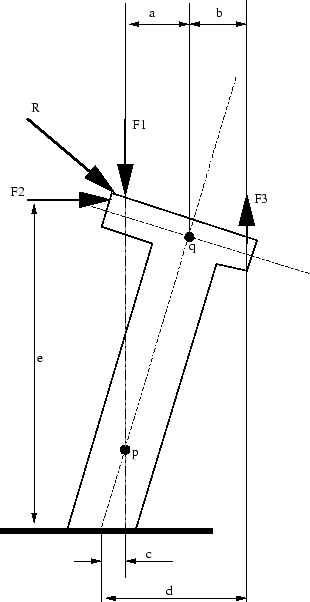 |
Figure 2:
compression and tension
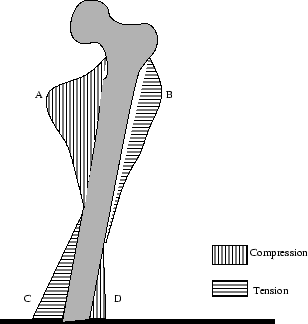 |
Please refer to figure 1 and 2.
Stress can be observed in the 4 areas A, B, C and D and is a result of the combination of
compression, tension and bending:
- compression because of the load on the head (force )
- tension because of the load on trochanter major ()
- bending because of lever and
- bending because of lever
 and
and 
- bending because of lever
 and
and
- bending because of lever
 and
and
- bending because of lever
 and
and
The two main influences are:
- compression because of
- bending, resulting from
 and their levers and , creating a moment around
From this is resulting compression in area A, and tension in area B.
Towards the distal end of the bone the influences from 5, 6 and 7 are increasing because their levers are increasing.
However, the influence of 6 might not be that big, since might be small. and might have the
main influence here tension in area C, compression in D.
Since the model and loading system are greatly simplified and because the load is not evenly distributed over the caput femoris
but acting on two points only
the observed strain and stress distribution might not represent the reality, which is much more complex.
The different loadcases produced different isochormatics, however the difference is only quantitatively.
22.03.2001
3D holographic interferometry not only measures the displacement of an object perpendicular in one direction,
but in all three dimensions. The principles are the same as in the interferometry discussed in the first meeting:
- Photo
- In a normal photo only the amplitudes of the light which are reflected
(or generated) by the investigated object are recorded.
Information about the wavelength is lost. The result is a two-dimensional image.
- Hologram
- In order to produce a hologram a coherent lightsource is needed (=laserlight).
Not only the amplitude, but also the wavelength of the light is recorded. The result is an image of the object
which can be viewed from different angles and the object appears from different angles.
- Interferogram
- is the double exposure of a hologram.
The displacement in one direction is recorded, and can be analysed by the number of fringes appearing on the image.
- 3-Dimensional Interferogram
- records information about the displacement in all 3 directions of the coordinate system.
This is achieved by producing 3 interferograms at the same time.
Three holografic plates have to be placed in different locations, but not necesseraly in the directions
of the three axis of the coordinate system. The displacements  and
and  can be calculated with:


with


and
 = displacement of object in the line of object and holographic plate
 = number of fringe on plate
 = angle between the lines
 and
and

= wavelength of lightsource
= angle between the x-axis and the line

= angle between the y-axis and the line

= angle between the z-axis and the line

The object of investigation was the segment of the vertebrae C5 and C6,
with a fixator plate applied.
The object was placed in a loading system, and two different loads applied.
Three holografic plates were placed on the table, both load cases were recorded on
the same plates (double exposure). The lightsource for each loadcase was applied for 4 seconds.
29.03.2001
In the regular method of photostress it is necessary to create a 2-dimensional model.
Often it would be too complicated though to create such a model of an object.
Also, it might be hard to simulate the load that is acting on the model.
Or maybe the object has to be investigated while being part of a complex machine
and must still perform it's function during the investigation.
In such cases photoelastic coating can help.
A layer of photoelastic epoxy resin is applied on the original object.
The application can be dfficult.
On flat objects it is simple, but on complex objects it might be hard to achieve an even coating thickness.
That coating is preapared like a shell, and is glued onto the object with reflecting glue.
The thickness of that layer is a compromise:
- a thin layer
- has little influence on the part, thus giving exact results
- a thick layer
- proiveds a good substance to analyse, many fringes will be visible.
If the layer is too thin, no fringes, or only one, will be visible.
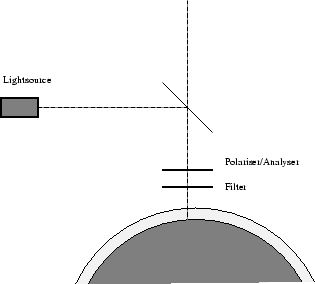
There are two ways of performing the tests:
- With a splitting mirror: the light is hitting the mirror,
being directed onto the object.
It is passing through the polariser and the
 filter,
hitting the object, being reflected by it and going back through the same
filter
and through the polariser, which is acting as the analyser now.
From there the beam is going straight through the mirror to the observer.
The setup for this method is quite compact, see figure 3.
filter,
hitting the object, being reflected by it and going back through the same
filter
and through the polariser, which is acting as the analyser now.
From there the beam is going straight through the mirror to the observer.
The setup for this method is quite compact, see figure 3.
Figure 3:
setup with a splitting mirror
 |
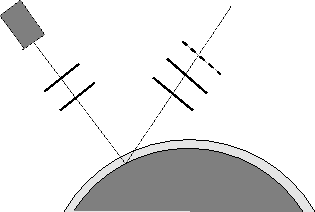
- The light is going through the polariser and the
filter towards the object,
passing through the coating, being reflected at the object, going through the coating again, but not in the same path.
Then it is passing through another
filter and through the analyser,
and from there it is going towards the observer.
See figure 4.
This is the more commonly used method.
Figure 4:
normal setup
 |
Since the lightbeam is going through the coating twice, the known formula
 is changing to
Since the photoelastic layer is rather thin and firmly attached on the surface of the object, it can be stated that
= Layer,  = Object
The poisson ratio  is:
is:
with
 and
and
 .
.
So we get:
And:
An aluminium plate had been coated with photoelastic material, and then overloaded.
So plastic deformation took place,
and now fringes can be seen even without any load applied.
Six points were marked on the object, and the question was:
What is the strain at these points?
With the help of a compensator the number of the fringe at a certain point can be calculated,
even when that number is not whole but has decimals,  for example.
The compensator is changing the relation of the phase of the two beams (representing the two principal stresses).
That way the retardation of the 2 beams is increased or decreased, and the line is moved ot a different location.
Procedure:
- Change the polarisation to linear. That way also isoclinics can be seen.
- Rotate the angle of polarization, until an isoclinic is right on the point.
- Change the polarization, so that only isochromatic lines can be seen
by applying the two
filters.
- By rotating the compensator move that isochromatic line to the point which is closest to it.
- Read the value from the compensator plate and calculate the fringe number :
- if the isochromatic line that was moved on the pointwas number
 ,
then the value read from the plate equals the decimals of ,
e.g.: value = 47, m = 0.47
,
then the value read from the plate equals the decimals of ,
e.g.: value = 47, m = 0.47
- if any other line but 0 was moved to the point,
then fringe number equals the number minus the value read from the compensator plate
e.g.: value = 47, fringe = 2, m = 2 - 0.47 = 1.53
Matthias Marx
2001-04-09